Original Link: https://www.anandtech.com/show/5157/nzxt-phantom-410-the-boutique-favorite-goes-on-a-diet
NZXT Phantom 410: The Boutique Favorite Goes On a Diet
by Dustin Sklavos on December 2, 2011 11:15 AM EST- Posted in
- Cases/Cooling/PSUs
- mid-tower
- NZXT
Introducing the NZXT Phantom 410
If you browse custom builds across different boutiques, you'll find NZXT's name comes up an awful lot. One of their enclosures, in particular, tends to see a lot of action: the Phantom. Its unusual angular design for some people is the right mix of style and gaudy, resembling the kind of case an Imperial Stormtrooper might choose if they were planning on learning how to at least hit the broad side of a barn in their off-duty hours. Today we take the wraps off of the Phantom's new fun size version, the Phantom 410, offering all the style without the massive footprint.
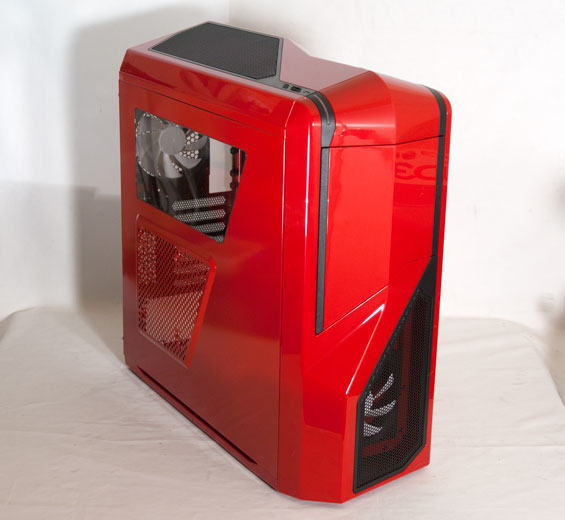
Indeed, if you remember the original Phantom (we unfortunately never got a chance to review the case on its own, but the iBuyPower Paladin XLC we reviewed employed the enclosure), you'll be at least a little bit amused by the Phantom 410. It's still not exactly a "small" case, but it's definitely more fun-sized compared to its predecessor. Fan controls have been reduced from three individual ones to a single main controller that runs the entire enclosure, while the drive bay door is latched closed (press in, then it pops out) as opposed to just swinging open. Other than that, it's pretty close to its larger predecessor.
| NZXT Phantom 410 Specifications | ||
| Motherboard Form Factor | ATX, Micro ATX, Mini ITX | |
| Drive Bays | External | 3x 5.25" |
| Internal | 6x 3.5"/2.5" | |
| Cooling | Front | 1x 120mm intake fan, 1x 120mm fan mount, 1x adjustable 120mm/140mm intake fan mount behind the drive cage |
| Rear | 1x 120mm exhaust fan | |
| Top | 1x 140mm exhaust fan, 1x 120mm/140mm fan mount | |
| Side | 1x 120mm/140mm fan mount | |
| Bottom | 1x 120mm fan mount | |
| Expansion Slots | 7 | |
| Front I/O Port | - | |
| Top I/O Port | Power and reset buttons, 2x USB 2.0, 2x USB 3.0, mic and headphone jacks, three-speed fan controller | |
| Power Supply Size | ATX | |
| Clearance | 10.5" with removable drive bay, 16" without (Expansion Cards), 170mm (CPU HSF), 200mm (PSU) | |
| Weight | 20 lbs (9.1kg) | |
| Dimensions | 8.46" x 20.31" x 20.94" (215mm x 516mm x 532mm) | |
| Price | MSRP $99 | |
While I've gotten used to other enclosures in this market getting bigger or adding new features, NZXT plays it fairly cautiously (in some respects at least) with the Phantom 410. Internal clearance is actually at a little bit of a premium, and while the Phantom 410 happily supports a 240mm radiator, you'll lose four drive bays if you decide to go with a video card bigger than an NVIDIA GeForce GTX 580. Massive tower-style coolers may also have trouble fitting due to the low clearance from the side panel.
In and Around the NZXT Phantom 410
Historically our readers haven't been very big fans of particularly garish enclosure designs; the stuff from Fractal Design and Antec (among others) have generally been more your speed. I largely tend to be in the same boat, but for some odd reason there's just something to be said for how delightfully off-kilter and gaudy the NZXT Phantom and its newer, smaller sibling, the NZXT Phantom 410 are. The odd angles and curves make the computer look like what everyone expected computers in the year 2011 to look like...in the seventies.
I'll come out and say it now: I don't think anybody is going to buy the NZXT Phantom 410 for practicality's sake. The bulging angles and corners aren't about using space efficiently, they're about style. Yet that said, NZXT does make a few allowances for ease of use. The door in front of the external drive bays pops open and closed easily but securely, allowing the case to maintain its aesthetic for the majority of the time, and the drive bay shields inside have small levers on them that allow them to pop out easily while remaining secure for unoccupied bays.
NZXT smartly keeps all the indicator lights, switches, and ports on the top of the enclosure, a modern design cue I wholeheartedly approve of. When the system is powered, a large stripe around the top left corner of the enclosure glows blue as a tertiary color. Thankfully NZXT also includes a pair of USB 3.0 ports that use an internal header; their Tempest 410 Elite made the poor decision of using three USB 2.0 ports and a single USB 3.0 port off an internal header, effectively wasting one USB 2.0 and one USB 3.0 port.
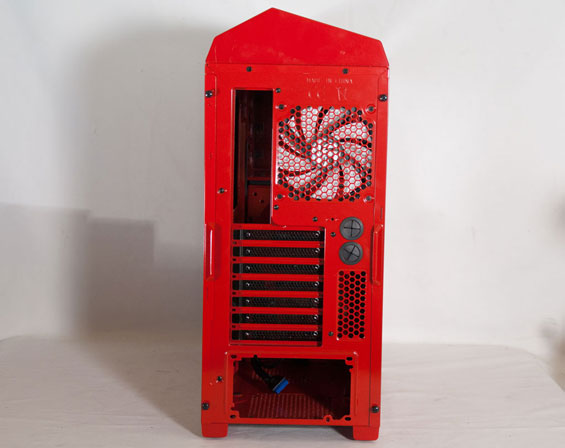
When we move to the back of the Phantom 410, we get our first clue that the inside may be a little more cramped than we're used to seeing: pay attention to the amount of space the I/O cluster, seven expansion slots, and power supply take up. You can tell there's a healthy amount of clearance behind the motherboard tray, but above it things are a little bit cramped.
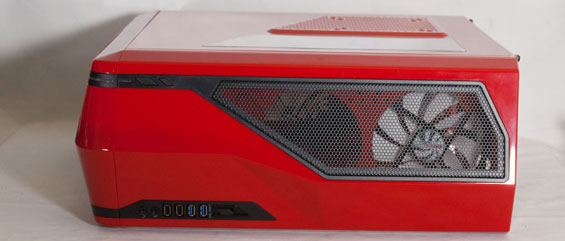
The side panel sports a window over where the CPU heatsink/fan unit typically rests, and then beneath it a grate with a 120mm/140mm fan mount that can blow cool air directly on the video card or video cards, which will be particularly useful for multi-GPU configurations. Both side panels are secured with two thumbscrews that were a little fussy in my review unit, but not much trouble with a proper screwdriver. When you do pop them off, though, you'll see that the inside of the Phantom 410 really is a bit on the cramped side.
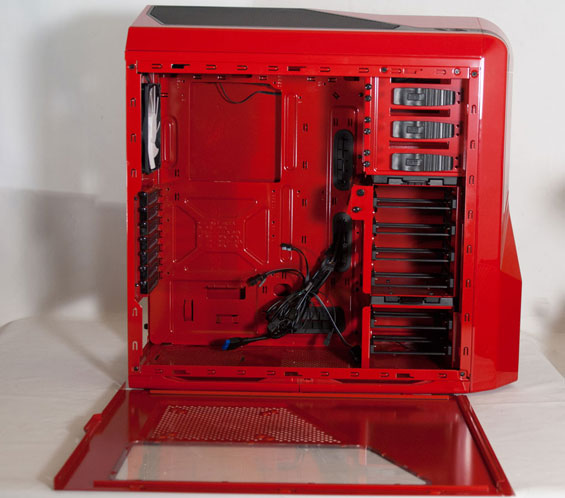
You can buy yourself some real estate by removing the drive cage, but in the process you're reduced to just two internal 3.5"/2.5" drive bays. That said, the drive cage also includes an internal fan mount that you can pivot to aim air directly at the processor, but in the process you'll take up space your video card might have otherwise occupied. It's a nice idea, but in practice the Phantom 410 just feels a bit too small to really get any mileage out of it. Also pay attention to clearance above the motherboard tray: the exhaust fan still clears the tray itself, but it's a pretty tight squeeze.


Ultimately, aesthetically the NZXT Phantom 410 is going to be a matter of taste. I have friends that love garish designs, sometimes ironically and other times earnestly. Personally I like the style, and again I fall somewhere in the middle of that continuum. As you'll see when we get to assembly, though, this is definitely going to be style over practicality, so plan accordingly.
Assembling the NZXT Phantom 410
Remember how I said the NZXT Phantom 410 is more style than substance? This is where things start to fall apart. While it's nowhere near the most difficult enclosure I've ever assembled, I can't help but feel like it's just a little too cramped. Maybe this design just wasn't meant to shrink down this much, or maybe NZXT could've allowed for an extra inch or two in the dimensions somewhere, but this one took a little elbow grease.
First, I'm always disappointed when motherboard standoffs don't come preinstalled from the factory in a modern case. They're a nice convenience and having to screw them in is both tedious and sometimes even a little bit frustrating (for example, having to remove the motherboard and realizing you didn't secure one or two of the standoffs as well as you thought you did). Getting the motherboard in also proved just how tight a fit things were going to be down the road, with the clearance between the top of the board and the top exhaust fan being a bit narrower than I'd've liked.
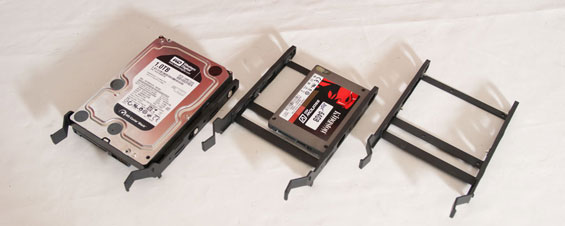
NZXT does thankfully provide for tool-less drive installation, but they do it a little oddly. While snapping in the optical drive required applying a bit of force, eventually it did go in securely. Where things are strange are the drive trays: they slide in behind the motherboard panel instead of above, meaning you have to remove the back panel to install them. The trays themselves are tool-less and snap into 3.5" drives without much struggle, and the ports on the drives do face back to keep cabling tidy, but I can't help but feel like this is a little bit backwards. Worse still, the trays are on the flimsy side and easy to push too far in, beyond where they were supposed to stop and secure. This isn't much of a problem when the girth of a 3.5" drive helps provide friction against the inside of the drive cage, but a 2.5" drive is so small and weightless that you actually have to be at least a little bit careful popping the tray into place.
I didn't have much trouble getting our NVIDIA GeForce GTX 580 test card into the Phantom 410, but it bears mentioning that the clearance between it and the pivoting internal fan mount is pretty slight; you're definitely not going to be able to mount a fan there if you have a 10.5" card, and the entire drive cage will have to come out if you plan on putting in a GTX 590 or AMD Radeon HD 6990 (or any other oversize card). Installing the power supply was also a fairly simple affair.
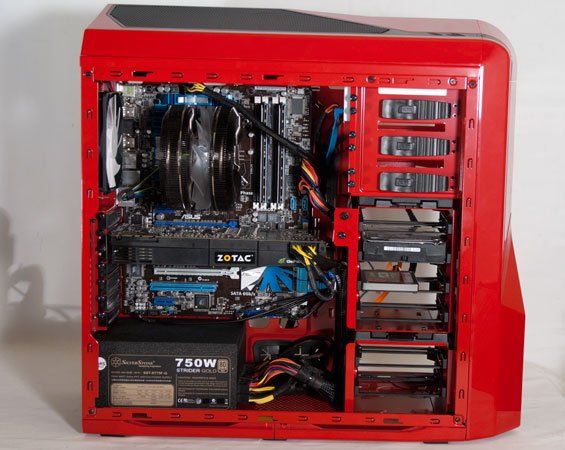
Honestly, where things went to hell was cabling. NZXT provides four additional leads for the fan controller, which is appreciated, though you'll have to cram them back behind the motherboard tray if you're not using them. That's a minor nuisance, but the real problem is that the holes in the motherboard tray specifically for cable routing are just too small and misplaced. When you take a look at the job I did wiring the Phantom 410, pay attention to the cables that would ordinarily get stashed behind the motherboard tray and aren't. Could I have routed them that way? With proper application of force and patience, probably, but it's light years behind Antec's P280 or any of Corsair's enclosures.


There are some really good ideas inside the NZXT Phantom 410, but it actually winds up just being too small to make them practical. NZXT does their best to make the Phantom 410 easy to work with within its existing dimensions, but those dimensions are a large part of the problem: this needed to be a bigger enclosure. This isn't the worst case I've ever had to assemble by a long shot, but there are much easier cases out there.
Testing Methodology
For testing ATX cases, we use the following standardized testbed in stock and overclocked configurations to get a feel for how well the case handles heat and noise.
| Full ATX Test Configuration | |
| CPU |
Intel Core i7-875K (95W TDP, tested at stock speed and overclocked to 3.8GHz @ 1.38V) |
| Motherboard | ASUS P7P55D-E Pro |
| Graphics Card | Zotac NVIDIA GeForce GTX 580 (244W TDP) |
| Memory | 2x2GB Crucial Ballistix Smart Tracer DDR3-1600 |
| Drives |
Kingston SSDNow V+ 100 64GB SSD Western Digital Caviar Black 1TB SATA 6Gbps Samsung 5.25" BD-ROM/DVDRW Drive |
| CPU Cooler | Zalman CNPS9900 MAX with Cooler Master ThermalFusion 400 |
| Power Supply | SilverStone Strider Gold 750W 80 Plus Gold |
A refresher on how we test:
Acoustic testing is standardized on a foot from the front of the case, using the Extech SL10 with an ambient noise floor of ~32dB. For reference, that's what my silent apartment measures with nothing running, testing acoustics in the dead of night (usually between 1am and 3am). A lot of us sit about a foot away from our computers, so this should be a fairly accurate representation of the kind of noise the case generates, and it's close enough to get noise levels that should register above ambient.
Thermal testing is run with the computer having idled at the desktop for fifteen minutes, and again with the computer running both Furmark (where applicable) and Prime95 (less one thread when a GPU is being used) for fifteen minutes. I've found that leaving one thread open in Prime95 allows the processor to heat up enough while making sure Furmark isn't CPU-limited. We're using the thermal diodes included with the hardware to keep everything standardized, and ambient testing temperature is always between 71F and 74F. Processor temperatures reported are the average of the CPU cores.
For more details on how we arrived at this testbed, you can check out our introductory passage in the review for the IN-WIN BUC.
Last but not least, we'd also like to thank the vendors who made our testbed possible:
Thank You!
We have some thanks in order before we press on:
- Thank you to Crucial for providing us with the Ballistix Smart Tracer memory we used to add memory thermals to our testing.
- Thank you to Zalman for providing us with the CNPS9900 MAX heatsink and fan unit we used.
- Thank you to Kingston for providing us with the SSDNow V+ 100 SSD.
- Thank you to CyberPower for providing us with the Western Digital Caviar Black hard drive, Intel Core i7-875K processor, ASUS P7P55D-E Pro motherboard, and Samsung BD-ROM/DVD+/-RW drive.
- And thank you to SilverStone for providing us with the power supply.
Noise and Thermal Testing, Stock
While the NZXT Phantom 410 features a three-speed fan controller, I found that the middle fan setting actually produced what sounded like a slight electrical whine that the minimum and maximum settings didn't have any trouble with. As a result, testing is confined to those two settings.
Honestly I had no idea what to expect with the Phantom 410. I had a bad feeling about the cramped quarters, but a cramped enclosure can often produce strong directed airflow (usually at the cost of acoustics). Outside of the NZXT H2 and its design flaw (with the front door closed the intake fans are starved for air), NZXT usually produces enclosures that have at least decent performance, but I still wasn't sure how well the Phantom 410 would do and I'll confess I wasn't entirely optimistic.
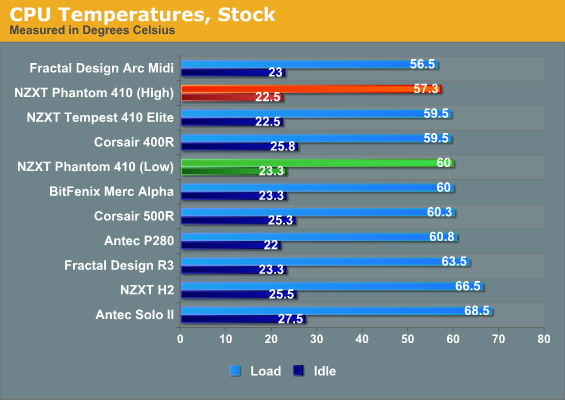
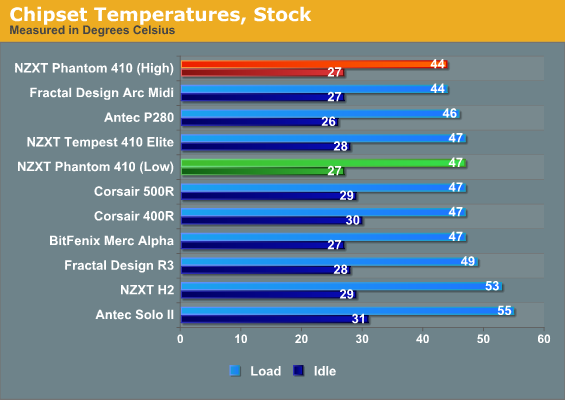
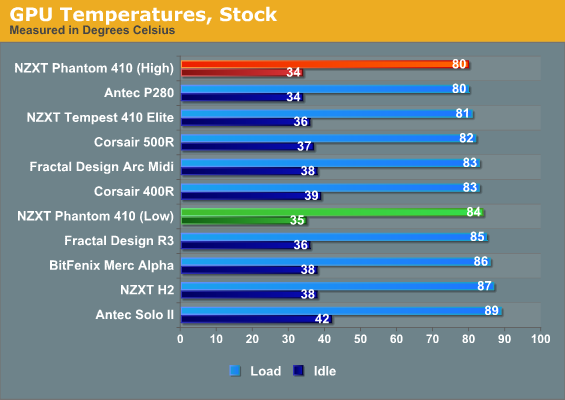
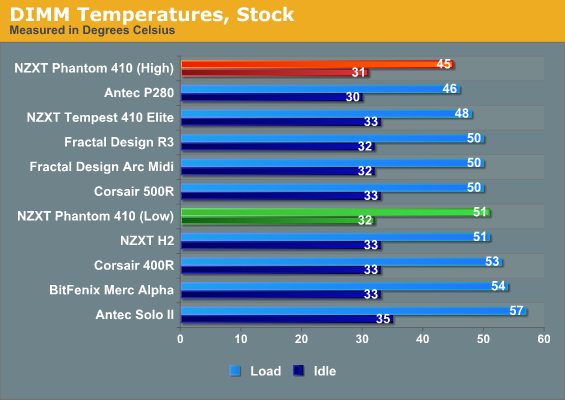
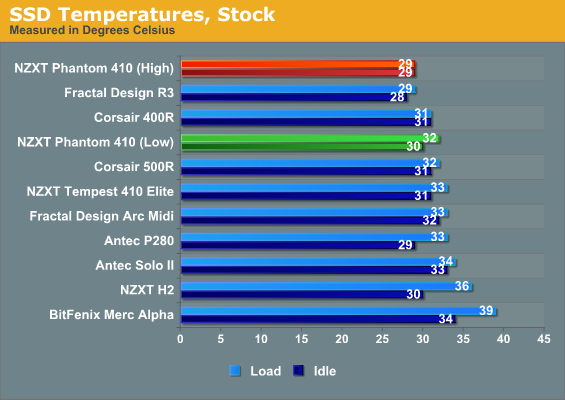
Imagine my surprise, then, when the Phantom 410 posted solid if unexceptional results at the low fan speed but performed remarkably well at high. Usually cases don't see a whole lot of variance between low and high fan speeds, but the Phantom 410 was able to get a lot of extra mileage out of the change. This suggests to me that the case may definitely have some room to grow after all; going a step further, replacing the fans may enable you to get great thermals without sacrificing acoustics.
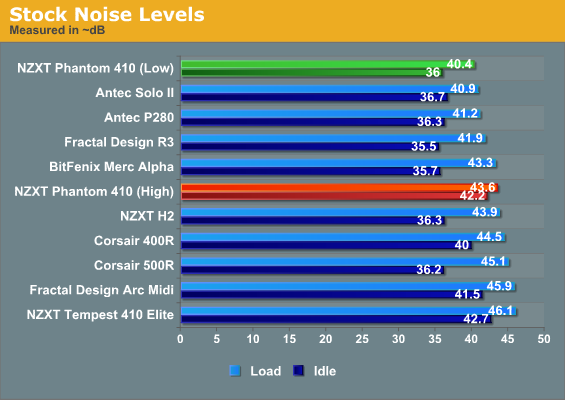
Here's where NZXT actually kind of embarasses themselves: the H2 was designed for silent operation, but the Phantom 410 is able to perform quieter than the H2 as well as running cooler. In fact, the Phantom 410 winds up being the best performing NZXT enclosure we've yet tested.
Noise and Thermal Testing, Overclocked
NZXT's Phantom 410 wound up putting in a remarkably strong showing in our stock testing, but the overclocked settings tend to be a make or break sort of situation. It's not at all uncommon to see core temperatures creep uncomfortably into the 90s, and the overall ambient temperature of the case tends to take a nasty turn with both chipset and memory thermals on the high side.
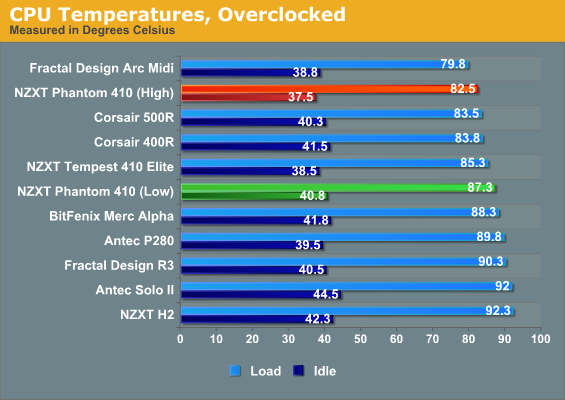
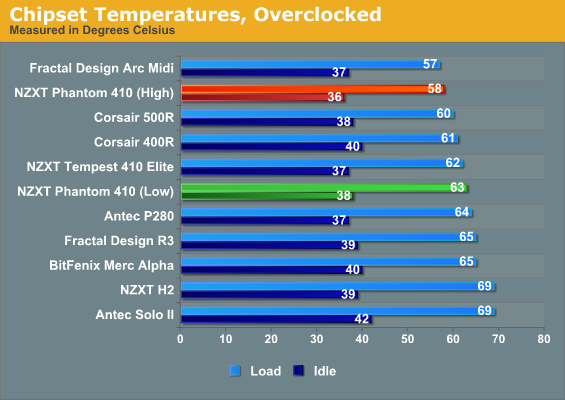
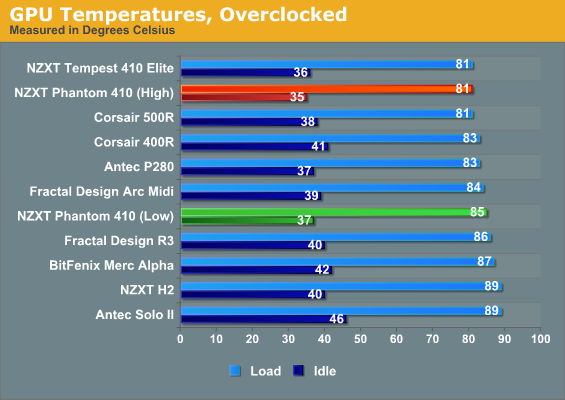
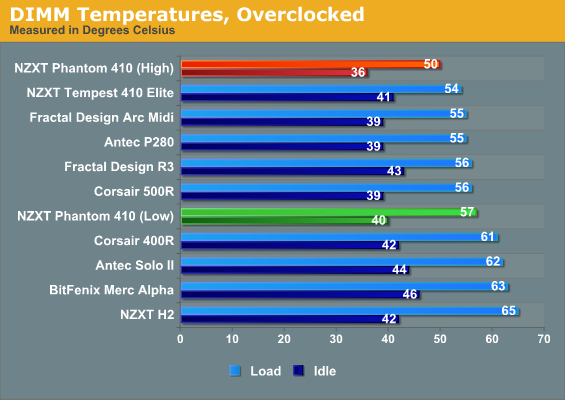
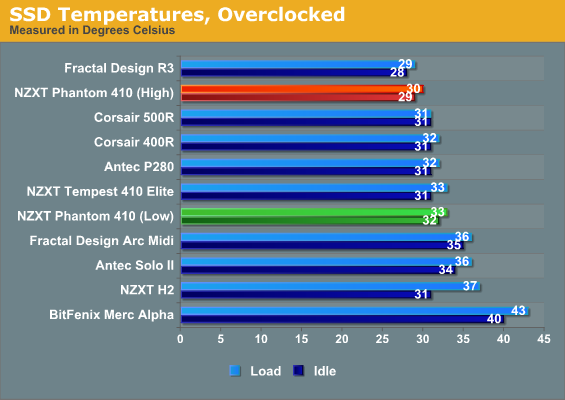
So there's good news and bad news. The good news is that if you're willing to jack up the fan speed, the Phantom 410 is able to make use of the increased airflow and put in a strong showing. Low fan speed keeps it at the middle of the pack, but the high speed makes a noticeable difference.

The bad news is that idle fan noise goes through the roof and the Phantom 410 winds up being one of the loudest cases we have on hand. If you're willing to manually switch the fans, or if your motherboard has good fan control, this may wind up not being a huge issue as load acoustics aren't actually that bad.
Conclusion: Worthy of Consideration
Now there's a conclusion I'll admit I was surprised to come to: the NZXT Phantom 410 is fun (possibly funny) to look at, but despite being kind of a pain to assemble it's actually a remarkably capable enclosure and definitely ranks among the better ones we've had in house.
Where NZXT has really excelled is in the way they've straight up outdone themselves. I've never been a fan of the H2 despite its healthy uptake in the boutique sector, but the Phantom 410 winds up being an excellent choice for that market and handily supplants the case that was engineered for silent running. Performance-wise it also trades blows with the Tempest 410, yet comes in ahead in acoustics and connectivity. If you're buying NZXT, there's an awful lot to like about the Phantom 410.
My quibbles with the Phantom 410 have to do with assembly. Frankly it's just a pain to put together, from start to finish. The mounting holes in the motherboard tray need to be a lot bigger, the drive trays could stand to be more rigid, and I'm never going to turn down having motherboard standoffs pre-installed. Connecting the AUX 12V line was particularly hellish. In this price range, there are definitely much easier cases to assemble.
While it's always nicer for me to have a clean cut conclusion and just say "oh, well, buy this one because it's the best," ultimately it's really better for you to have a plethora of options at a given price point. Some people don't care about what kind of box their computer goes in as long as it works, and some of us like being able to express ourselves (for better or worse) with our enclosure choices. The Phantom 410 may be a little more difficult to assemble than competing cases, but it performs right along with the best of them and offers a decent enough selection of features to be worthy of your consideration. At the magical $99 price point there's healthy competition there, but at least if you like how it looks you won't have to make any sacrifices in performance.


